Wednesday, May 11, 2016

Using Self Signed Certificate With Retrofit Android

The Problem
You are developing an application with its own backend server and you want to create a secure SSL connection from your Android app with a self signed certificate

You are
  1.  Using retrofit 2
  2.  Have the self signed certificate and its root CA, if you don't then this link can help you 
You could however install the certificate manually the device but it has two drawbacks
  1. You have to do it for every device
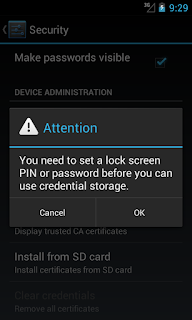
  2. You force the user to have a pattern, pin or password lock


Solution
First we are going to add the certificate CA to the "res\raw" folder in this case the certificate is called car.crt

when you are building a normal retrofit request it is usually something like this

_retrofit = new Retrofit.Builder()
       .baseUrl(CustomService.API_URL)
       .addConverterFactory(GsonConverterFactory.create())
       .build();


we are going to change that a little bit, by doing the following 
we are going to read the certificate and then we are going to add it to a keystore same as in Android developer and then create an OkHttpClient and return it


private static OkHttpClient getHttpClient(Context context){
    try {
        // Load CAs from an InputStream        
        // (could be from a resource or ByteArrayInputStream or ...)        
        CertificateFactory cf = CertificateFactory.getInstance("X.509");
 // get InputStream for the certificate
        InputStream caInput = context.getResources().openRawResource(R.raw.car);
        Certificate ca;
        ca = cf.generateCertificate(caInput);
        System.out.println("ca=" + ((X509Certificate) ca).getSubjectDN());
        // Create a KeyStore containing our trusted CAs        

        String keyStoreType = KeyStore.getDefaultType();
        KeyStore keyStore = KeyStore.getInstance(keyStoreType);
        keyStore.load(null, null);
        keyStore.setCertificateEntry("ca", ca);
        // Create a TrustManager that trusts the CAs in our KeyStore        

        String tmfAlgorithm = TrustManagerFactory.getDefaultAlgorithm();
        TrustManagerFactory tmf = TrustManagerFactory.getInstance(tmfAlgorithm);
        tmf.init(keyStore);
        // Create an SSLContext that uses our TrustManager        

        SSLContext sslcontext = SSLContext.getInstance("TLS");
        sslcontext.init(null, tmf.getTrustManagers(), null);
        final OkHttpClient client;
        client = new OkHttpClient.Builder()
                .sslSocketFactory(sslcontext.getSocketFactory())
                .build();
        caInput.close();
        return client;
    } catch (Exception e) {
        return null;
    }
}

Now when you are building your retrofit object you are just going to add an extra line
_retrofit = new Retrofit.Builder()
       .client(getHttpClient(context))
       .baseUrl(CustomService.API_URL)
       .addConverterFactory(GsonConverterFactory.create())
       .build();
You can now use retrofit to create any request over an Https connection. please comment or contact me in case you have something to add or found any bugs.

Tuesday, September 15, 2015

Android: Saving Bitmap as Serializable Object

The Problem

In Android you cannot save the any bitmap Object as serilizable objects and you cannot add implement Serializable Interface as it is a final class.
so In general the problem is "Saving bitmap Images as Serializable Object"


The Solution

Luckily there is a very simple way to do this
Those who are experts of you will find the next two lines sufficient

bitmapObject.getPixels(pixels,0,width,0,0,width,height);
 &
Bitmap.createBitmap(pixels, width, height, Bitmap.Config.ARGB_8888);

Still not getting it

Well here it is how,

  • First we create a simple class, we will call it ProxyBitmap, why use the word "proxy" ?
    public class ProxyBitmap
  • Make the class serializable
    public class ProxyBitmap implements Serializable {}
  • Add the following attributes
    private final int [] pixels;
     // this array will hold the pixels of the bitmap Image
    
    private final int width , height;
    // those will hold both the width and height attributes
  • Now adding the constructor, we take bitmap as input in the constructor to get its pixel data.
    public ProxyBitmap(Bitmap bitmap){
       width = bitmap.getWidth();
       height = bitmap.getHeight();
       pixels = new int [width*height];
       bitmap.getPixels(pixels,0,width,0,0,width,height);
    }
  • Now to create a method that will return the bitmap object
    
    public Bitmap getBitmap(){
        return Bitmap.createBitmap(pixels, width, height, Bitmap.Config.ARGB_8888);
    }
  • The whole class will look something like this according to your preference 
    
    import android.graphics.Bitmap;
    import java.io.Serializable;
    /** * Created by John on 07-Sep-15. */
    public class ProxyBitmap implements Serializable{
        private final int [] pixels;
        private final int width , height;
    
        public ProxyBitmap(Bitmap bitmap){
            width = bitmap.getWidth();
            height = bitmap.getHeight();
            pixels = new int [width*height];
            bitmap.getPixels(pixels,0,width,0,0,width,height);
        }
    
        public Bitmap getBitmap(){
            return Bitmap.createBitmap(pixels, width, height, Bitmap.Config.ARGB_8888);
        }
    }
  • Now you can use the ProxyBitmap object whenever you want to save Bitmap objects, I wrote a whole example , showing how I save and load serialized ProxyBitmap objects here it is 

Saturday, June 27, 2015

Selecting Files and Folders in Android

The Problem

I have a program that I wanted the user to do both selecting files and selecting directories; the libraries that I found offered different UI for each action ( selecting file / folders) which is not visually suitable for the user.

The Solution

I had to write my own library to select those files and folders. This is its Git repo "MyFileChooser" where you can see the code and download the jar file.

How to use

How to set up the library in your project download the jar file
Import the jar file into your project 


  1. Right click on your project.
  2. Select properties
  3. Select "Java Build Path" then "Libraries" tab and then choose "Add External JARs"
  4. Choose the jar file that you downloaded.
  5. Add the following lines into you manifest file
  6. <activity
        android:name="com.john_aziz57.myfilechooser.MainActivity"
        android:exported="true" >
    </activity>
  7. Since you will probably will read or write files don't forget to add the appropriate permissions
  8. The place where you want to start the activity add the following code to select folders
    Intent i = new Intent(YourCurrentActivity,
            com.john_aziz57.myfilechooser.MainActivity.class);
    i.putExtra(MainPresenter.TAG, MainPresenter.SELECT_FOLDER);
    startActivityForResult(i, FOLDER_SELECT_CODE);
to select files
    Intent i = new Intent(YourCurrentActivity,
            com.john_aziz57.myfilechooser.MainActivity.class);
    i.putExtra(MainPresenter.TAG, MainPresenter.SELECT_FILE);
    startActivityForResult(i, FILE_SELECT_CODE);
in "onActivityResult" add the following code
protected void onActivityResult( int requestCode, int resultCode, Intent data) {
    switch (requestCode) {
    case FILE_SELECT_CODE:
        if (resultCode == RESULT_OK) {
            // Get the Uri of the selected file
            Uri uri = data.getData();
            // Get the path
            String path = uri.getPath();
                            .......

Screen Shots

here are screen shots inside my Absence program. first one for selecting files and the second one is for selecting folders

Final Notes

I don't expect that this project will meet up with all your needs, feel free to download the code and adjust it as much as you want or comment below for suggested enhancements

Sunday, December 7, 2014

How to generate Excel Report Oracle Forms and Reports 11gR2

About

We upgraded from 6i to 11gR2 so it took me some time to know how to generate Excel in Oracle Forms and Reports 11gR2. So I wrote it down to help those who couldn't figure it out.In my case I am supposed to generate the Excel file after pressing a certain button,so here is how I did it.

How To


  1. Open the form required to generate the Excel report using Oracle Form Builder
  2. In the Object Navigator pane go to reports
    going to Reports in Object Navigator
  3. Select "Create" button
    selecting create button
  4. A window will appear asking you to choose whether to create new report or use existing one. If you have a source "RDF" file of the report choose "Browse" and select the file
    window asking to choose how will you like to add the report
  5. After browsing for the report, click "Ok"
  6. A new report object will appear in the Object Navigator
    here the report appeared automatically named to "REPORT274"

  7. Press F4 to open the Property Palette. In the Report Destination Format type in "ENHANCEDSPREADSHEET"
  8. Go to the button and add a trigger "WHEN-BUTTON-PRESSED"
  9. Open the PL/SQL editor to write the trigger function
    DECLARE
    REPORT_ID Report_Object; 
    PARAM_LIST PARAMLIST;
    REPORT_STATUS VARCHAR2(100);
    JOB_ID VARCHAR2(100); 
    REPORT_SERVER_JOB VARCHAR2(254);
    BEGIN
    REPORT_ID := find_report_object('REPORT274');

    SET_REPORT_OBJECT_PROPERTY(REPORT_ID,REPORT_SERVER,'report_server_name'); 

    -- IN CASE YOU WANT TO CREATE PARAMTER LIST AND PASS IT 
    -- TO THE REPORT
    PARAM_LIST := GET_PARAMETER_LIST('DATA');
    IF NOT ID_NULL(PARAM_LIST) THEN
     DESTROY_PARAMETER_LIST('DATA');
    END IF;
    PARAM_LIST :=CREATE_PARAMETER_LIST('DATA');
     
    ADD_PARAMETER(PARAM_LIST,'PARAMETER',TEXT_PARAMETER,'Y');

    REPORT_SERVER_JOB:=RUN_REPORT_OBJECT(REPORT_ID,PARAM_LIST);
    REPORT_STATUS := REPORT_OBJECT_STATUS(REPORT_SERVER_JOB); 

    IF REPORT_STATUS = 'FINISHED' THEN 
    JOB_ID := substr(REPORT_SERVER_JOB,instr(REPORT_SERVER_JOB,'_',-1)+1);
    WEB.SHOW_DOCUMENT ('/reports/rwservlet/getjobid'|| JOB_ID ||'?server='||'report_server_name','_blank');
    ELSE 
    MESSAGE ('Report failed, Error message '||REPORT_STATUS); 
    END IF; 
    END;
  10. Now Open the Forms from your web browser, and press the excel button which we added the trigger to.
    the forms open in Internet Explorer, -this is not an original image-
  11. The following download window will appear
  12. Save the file and open it with Excel.

Notes

  • When opening the file in Excel, Excel may prompt a message asking if you are sure that this is an Excel file or not. you should click yes. However the reason for this error is that the generated file is not ".xls" format rather ".htm" which Excel can open it easily and view it as spread sheet.

Thursday, September 11, 2014

Compile Multiple Forms and Multiple Reports For Oracle Forms/Reports 11g

The Problem

Right now In the company we are upgrading our system form Oracle Forms/Reports 6i to Oracle Forms/Reports 11g.
I found myself in need of compiling multiple Forms and Reports - about 1200 each -.
To  Open each and compile is rather dull and exhausting process

The Solution

A- Forms and PLL and menus:

I found a Script about compiling multiple Forms. Here it is how to do it.

1- Create a new file with  Notepad or Notpad++ - I prefer Notepad++ - and name it "compile.bat"

2- Paste The following code into the "compile.bat" file. Note: This code also compile ".pll" and ".mmb" files.

@ECHO OFF 
cls 
Echo libraries compilation.... 
for %%f IN (*.pll) do ( frmcmp userid=scott/tiger@orcl module=%%f batch=yes module_type=library compile_all=yes window_state=minimize & ECHO %%f )
ECHO libraries compilation finished ---
Echo menus compilation.... 
for %%f IN (*.mmb) do ( frmcmp userid=scott/tiger@orcl module=%%f batch=yes module_type=menu compile_all=yes window_state=minimize & ECHO %%f )
ECHO menus compilation finished ---
Echo forms compilation.... 
for %%f IN (*.fmb) do ( frmcmp userid=scott/tiger@orcl module=%%f batch=yes module_type=form compile_all=yes window_state=minimize & ECHO %%f )
ECHO forms compilation finished ---


3- Replace "scott/tiger@orcl" with the connection your connection string "userid/password@databasename" 

4- Place the "compile.bat" file  into the folder that has the your forms

5- Double click the "compile.bat" file to run it.

6- The error logs will be written to file with ".err" extension.

7- Note: In case you don't want to compile a ".pll" file just remove its for loop form the bat file, same with other types.


B- Reports:

I worked it out the same way as I did with the forms. Here it is how to do it

1- Create a new file and name it "rpcnvrt.bat"

2- Paste The following code into the "rpcnvrt.bat" file.

@ECHO OFF
        cls 
        Echo report convertion.... 
        for %%f IN (*.rdf) do ( rwconverter userid=scott/tiger@orcl stype=RDFFILE DTYPE=REPFILE batch=yes OVERWRITE=YES source=%%f & ECHO %%f )
        ECHO report compilation finished ---

3- Replace "scott/tiger@orcl" with the connection your connection string "userid/password@databasename" 

4- Place the "rpcnvrt.bat" file  into the folder that has the your reports

5- Double click the "rpcnvrt.bat" file to run it.

6- The error logs will be written to file with "reports.log" extension.

7- Note: For more options on the rwconverter visit this link.

  •  BATCH
  • CMDFILE
  • COMPILE_ALL
  • CUSTOMIZE
  • DEST
  • DTYPE
  • DUNIT
  • FORMSIZE
  • JVMOPTIONS
  • OVERWRITE
  • P_AVAILABILITY
  • P_DESCRIPTION
  • P_FORMATS
  • P_NAME
  • P_OWNER
  • P_PFORMTEMPLATE
  • P_PRINTERS
  • P_PRIVILEGE
  • P_SERVERS
  • P_TRIGGER
  • P_TYPES
  • PAGESIZE
  • PARAMETER
  • RECURSIVE_LOAD
  • SOURCE
  • STYPE
  • USERID


8- Note: Spaces in the name of the reports seems to be causing an error. Place double quotes around  %%f to be like this "source=%%f".

9- I placed the the attributes for the report conversion in this order because some error happens that I didn't have the time to check it out.

Any questions I will be happy to do my best to answer

Monday, August 25, 2014

Problem using Oracle Forms 11g Migration Assistant


oracle.forms.jdapi.JdapiException: FRM-10102

The problem

I am using Oracle Forms Migration Assistant GUI to upgrade the forms from 6i to 11g. After I choose the module and connect to the database and click finish, I get the following

ERROR opening C:\Users\sbotros\Desktop\FORM\APDPXXFX.fmb :oracle.forms.jdapi.JdapiException: FRM-10102: Cannot attach PL/SQL library Ofg4bsl. This library attachment will be lost if the module is saved.FRM-10102: Cannot attach PL/SQL library Ofg4TEl. This library attachment will be lost if the module is saved.FRM-10102: Cannot attach PL/SQL library Ofg4mes. This library attachment will be lost if the module is saved.
Obviously some of the PL/SQL libraries he can't find

The  Solution

When you run the Migration Assistant you probably run the following file 'frmplsqlconv.bat' and then the Migration Assistant Wizard pops up. What I have noticed that this file has its own FORMS_PATH which it reads from those libraries. P.S. open the file using Notepad++ or other text editors.
.......... 
set FORMS_PATH=%FORMS_PATH%;D:\ORACLE\Middleware\Oracle_FRHome1\forms; 
..........

What I did was add the path where my libraries are so the file became like this


.......... 
set FORMS_PATH=%FORMS_PATH%;D:\ORACLE\Middleware\Oracle_FRHome1\forms;D:\LIB; 
..........

The additional part is in BOLD and voila. run again every thing will run smoothly.

Please leave any comment if something is not clear.

Me

First: introduction,
Name: John Aziz, I am graduate from Computer and System department (CSED2014) Faculty of Engineering Alexandria University, Egypt

Second: why
I created this blog cause I have faced many bugs or problems during my work and I have somehow managed to solve most of them so I want to share what I know with the world somehow to repay the people who helped me solve some of my problems - bugs - that I faced and may be also to encourage others to do so and share their experience.

Thrid: p.s.
I am still new in this blog world, so bear with me if any error occurred, thanks.

Fourth: stackoverflow
my account stackoverflow